Ready to build your first gaming PC? Here’s the honest guide with all the things popular build guides forget to mention.
Building Your First Gaming PC in 2025: What No One Tells You
Building my first gaming PC was one of the most satisfying experiences I’ve had as a gamer. It was also one of the most stressful. And I think those two things are inseparable.
Every forum post and YouTube video made it look straightforward. But those guides always seemed to leave out certain things — the stuff you only learn when you’re sitting in a pile of components at 11pm, your motherboard refusing to POST, wondering if you’ve destroyed a $500 graphics card.
This guide is the one I wish I’d had.
Before You Buy Anything: Set a Real Budget
I see new builders constantly make the same mistake: they set a budget, fall in love with components that exceed it, tell themselves they’ll “make it work,” and end up overspending significantly.
Be honest with yourself about what you’re willing to spend, then subtract 10% as a contingency fund. Unexpected things happen. Sometimes the first thermal paste application goes wrong. Sometimes you need an extra cable. Sometimes a case fan dies on arrival.
Also: the budget should include everything. The PC itself, yes — but also the peripherals you’ll need. Monitor. Keyboard. Mouse. Headset. These add up fast, and a lot of first-time builders forget to factor them in.
The Component Priority Order
Where you spend your money matters more than how much you spend. Here’s the priority hierarchy that experienced builders mostly agree on:
GPU first. If you’re building for gaming, the graphics card is the most important component. An excellent GPU will outperform a mediocre one regardless of what else is in the system (within reason). Don’t cheap out here.
CPU second. You want a processor that won’t bottleneck your GPU. You don’t necessarily need the most powerful CPU on the market — just one that keeps up.
RAM: 32GB is the new standard. The days when 16GB was “more than enough” are behind us. Modern games and operating systems together eat a surprising amount of RAM. Go 32GB, DDR5 if your motherboard supports it.
Storage: NVMe SSD, no compromises. Don’t even think about a traditional hard drive as your primary drive. An NVMe SSD will make your operating system and games load dramatically faster. Get at least 2TB — games are enormous now.
PSU: Don’t be cheap. The power supply is the component that ruins everything if it fails. Buy a reputable 80+ Gold or Platinum rated unit from a known brand. This is not the place to save $30.
The Things Nobody Tells You
Here we go. The stuff the YouTube tutorials gloss over:
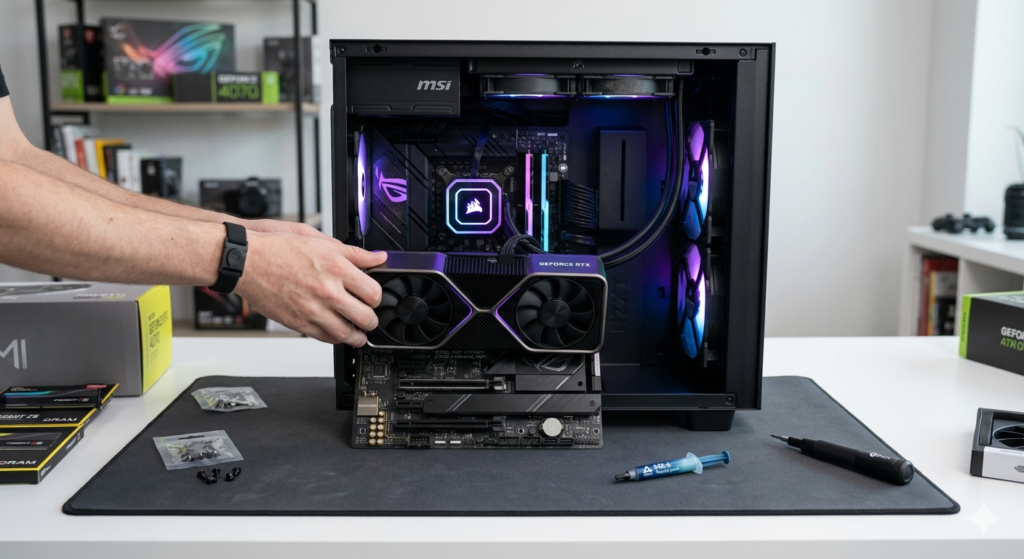
Cable management is harder than it looks. Those beautiful clean builds you see in review videos? They take way longer than the actual component installation. Block out time for this. Your airflow — and your sanity — will thank you.
The first boot is almost always terrifying. You’ll hit the power button and for about two seconds nothing will happen and you’ll be convinced you did something catastrophically wrong. Then the fans spin up, the RGB lights, and the BIOS screen appears and you’ll feel a rush of relief that’s hard to describe.
Except when it doesn’t POST. This happens to almost everyone their first time. Don’t panic. Common culprits: RAM not fully seated, power connectors not fully clicked in, display cable in the wrong port (plugged into the motherboard instead of the GPU). Work through it methodically.
Read your motherboard manual. Seriously. I know you don’t want to. Nobody wants to. But your specific motherboard has specific quirks — which RAM slots to use for optimal performance, how to enable XMP/EXPO for your RAM speed, which M.2 slot disables SATA ports. This information is in the manual and not knowing it can cost you significant performance.
Thermal paste: less is more. A pea-sized dot in the center of the CPU is the standard method. The “more is better” instinct is wrong here. Too much paste can actually insulate rather than conduct heat.
The Most Common Mistakes
Forgetting standoffs. These small brass spacers go between your motherboard and the case. Forgetting them means your motherboard is sitting directly on metal and will short. Check this.
Installing RAM in the wrong slots. Most dual-channel setups want RAM in slots 2 and 4, not 1 and 2. Your manual will specify. Ignoring this can cut your memory bandwidth significantly.
Skipping cable management. Yes, we already covered this. But it’s worth repeating because it affects airflow and temperatures, not just aesthetics.
Not testing outside the case first. This is optional but smart: before installing everything in the case, do a “bench test” — just the essential components (CPU, one stick of RAM, GPU, PSU) outside the case to confirm it boots. This makes troubleshooting much easier if something’s wrong.
The Most Satisfying Part
When everything is in, the cables are managed, you’ve closed the case and plugged it in and hit power — and it works — there’s a feeling that’s hard to explain to anyone who hasn’t experienced it.
You built this. Every component chosen for a reason, every cable routed with care, every piece installed with your own hands. And now it’s running games at settings and resolutions that feel like science fiction compared to what you were playing on before.
That feeling is absolutely worth the stress of getting there. I promise.